Anatomy of a Tween Library
Every game engine seems to have dozens of tween libs available. In this post we will dive head first into what a tween lib really is and eventually end up with the design decisions that went into GoKit, GoKitLite and the soon to be released ZestKit (yes, that will be the third open source tween lib that I release for Unity. Shoot me).
At it’s very core, a tween lib is utterly simple. What it boils down to is just the following (position is used for this example but the same exact thing applies to floats, quaternions, vectors, ints, etc): trans.position = from + ( to - from ) * elapsedTime
or even simpler:
trans.position = lerp( from, to, elapsedTime )
where elapsedTime ticks from 0 to 1. Now that is just a linear interpololation which is the ugliest, most unnatural way to move an object but adding more interesting easing to this is pretty trivial.
If a tween lib is so simple why are there so many of them? Mainly convenience. The tween lib can cover lots of boilerplate code like managing the tween state, allow pause/resume, syntactic sugar, caching, etc. Before we get into any gory details lets have a look at the two previous tween libs that I have made (you can find them on GitHub).
GoKit Breakdown
GoKit uses an object oriented approach to tweening. It is extremely flexible, extensible and quite comprehensive. It was designed around the idea of configuring a tween (what to tween, duration, delay, etc) and reusing the configuration object. It was also intended that folks would subclass the various tween types to make their own. In reality 99.8% of people just used GoKit directly without making any of their own tweens.
GoKitLite Breakdown
GoKitLite is the antithesis of GoKit. It is not extensible at all. GoKitLite was made for raw speed. It doesn’t allocate anything at runtime and it can tween all the most common items (mainly Transform and Material properties). GoKitLite was designed to be stuck in a DLL and used as is. Because of that when it is used in source form (as it is almost always) there are gobs of internal state that are exposed to callers. That is mainly due to the liberal use if the internal keyword which does nothing at all if the code isn’t packaged up in a DLL.
Now We Are Wiser. Introducing ZestKit
I decided to have one more go armed with the knowledge of the past. The goals were simple: it has to be as fast as GoKitLite and as extensible as (and easier to extend than) GoKit. The public API should be simple and foolproof and it needs to be able to tween anything.
The image below has a breakdown of the major parts involved in ZestKit. The breakdown of responsibilies allows for a nice separation of duties.
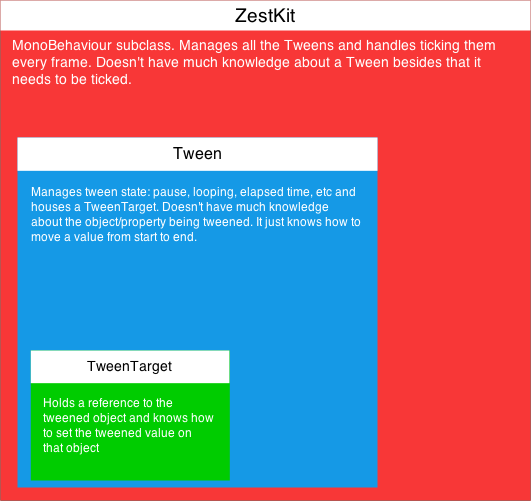
The ZestKit class is the only MonoBehaviour subclass. It manages a list of Tweens and that is all it does. The Tween class manages it’s own state: paused, playing, elapsed time, looping, etc. The TweenTarget class doesn’t do anything at all besides setting the actual property on the object. The static Zest class is the mathematician. It knows about easing and lerping and all that jazz. Being a static class it can be used independently of the rest of ZestKit.
Interfaces Everywhere!
Why use interfaces at all? Interfaces are a great way to separate responsibility. I know that a tween needs to be able to be ticked before I even write a single line of code. The ZestKit class doesn’t need to know anything more about a Tween besides this fact. Stick tick in an interface and we can wire up the entire ZestKit class. It will only ever know that it is dealing with objects that have a tick method. This gives us some great flexibility. Since all we need is a tick method we can add objects that implement that tick method but are not necessarily tweens themselves. Maybe we want to be able to chain a bunch of tweens together and run them one after the other. Implementing a class that does that and can be managed by ZestKit is possible because of interfaces.
Interfaces are also great for adding extensibility to a library. In the case of the Tween class (see the image above) you can see that it houses a TweenTarget. That target is really an ITweenTarget<T> (where T is the value type being tweened: float, Vector2, int, etc). Remember above that one of the goals was to make ZestKit easier to extend than GoKit? The ITweenTarget is the key to all that. With ZestKit all you need to do to be able to tween anything at all is implement the single method in the ITweenTarget interface. Let’s say you have a Quaternion property (myQuatProp) that you want to tween in your class (SuperClass). All you have to do to make it ZestKit ready is add the following method to your class:
1 2 3 4 5 6 7 | |
Interfaces can also be used as a means to make a succinct public API. All of the tween creation methods in ZestKit do just that. They only ever return an ITween<T>. This lets anyone calling the ZestKit methods have an object with a nice, concise interface applied. No extra cruft shows up when autocompleting a method in your IDE. You see only the relevant Tween-specific methods.
If you made it this far, congratulations! ZestKit is being developed alongside a game (someone has to dogfood this stuff!) and should be commented up and ready for release real soon. Watch out for it on GitHub.